If you are an avid smartphone user, it’s more than likely that you’ve got 100s if not 1000s of photos and videos stored on your device. Not to mention the photos you haven’t even taken – for example the ones automatically saved to your phone from apps like WhatsApp and other popular chat/social services.
If you are looking to free up storage on your phone to make space for more content or simply to speed up it’s performance, you’ll be looking for ways to safely and securely backup your photos and videos for later viewing – ideally, without compromising the quality of stored files.
Here we’ll show you two of the most popular ways of doing this.
Backing up Photos and Videos to Google
Backing up photos and videos is actually pretty easy with Google, and it has gotten far easier over the past few years.
If you’re not already using Google Photos, you should be. The service automatically backs up every photo and video you take to the cloud, so you’ll never have to manually back up your media ever again. If thePhotos appisn’t already on your phone, you candownload it here. Once it’s installed, you’ll need tomake sure Photos is set to automatically back up your files. Here’s how to do that:
- Open the Google Photos app.
- In the menu, head toSettings.
- TapBackup & sync.
- Make sure the switch is turned on.
The best part about Google Photos? You can upload as many files as you’d like for free. However, Googlewill changethat rule soon. Starting June 1, 2021, any new photos and videos you upload will count toward the free 15GB of storage that comes with every Google Account.
Worry not, as any photos or videos you may have uploaded in high quality before June 1, 2021 will not count toward your 15GB of free storage and will still be considered free and exempt from the storage limit.
You should also know that if you back up your photos and videos in original quality, they will continue to count toward your 15GB of free storage across your Google Account.
That said, if you have a Pixel phone, photos uploaded from that device won’t be impacted. Photos and videos uploaded in high quality from Pixels will continue to be exempt from this change, even after June 1, 2021.
If you would like to up your storage space after the June deadline, you’ll have to purchase aGoogle Oneplan.
Photos and videos will have a maximum upload quality of 1080p for the free unlimited storage option, which should be good enough for most people. If you’d like to keep the original resolution quality of your photos and videos, you can, but it will count against your Google Drive storage limits. Here’s how to check your Google Photos upload quality:
- Open the Google Photos app.
- In the menu, head to Settings.
- Tap ‘Backup & sync’.
- Tap ‘Upload size’.
- Choose the option you’d like (High quality or Original quality).
Backing up Photos and Videos to your PC or MAC
There are a number of Android users who also wish to manage the data on their smartphone without using cloud services, due to the sensitivity of their files, or simply, they do not wish to rely so heavily on external services to securely store their precious photos and videos. Afterall, no cloud service is immune from a data breach.
Nowadays, backing up and restoring your Android photos and files via your PC can be achieved in just a click, there’s no need to manually move each and every photo, video, text message or document stored on your device.
Dr.Fone – Phone Backup & Restore is the most popular Android PC Suite due to it’s simplicity, range of options and pleasing design.
Here’s how you can use the software to better manage your next smartphone backup and restore. You’ll need the following things in order to get started:
1. Your current phone
2. A laptop or PC
3. A USB to smartphone cable
4. You’ll need to download Dr.Fone – Phone Backup & Restore.

Before we show a step by step of how to backup your smartphone contents, here’s a brief overview of the solution Dr.Fone – Phone Backup & Restore.
Features of Dr.Fone – Phone Backup & Restore
One Click to Backup Your Android Phone
This data backup application is preferred to other software and even cloud backup services due to it’s ease of use. The whole process of backing up your data takes just one click. Once your Android or iOS device is connected via USB, the application will automatically backup data to your computer, without overwriting any previous backups.
Restore Backup Selectively – to Android or iOS
When looking to restore content to your smartphone, you can preview and select the data you wish to restore. The software works seemlessly across operating systems, so you can restore your data to a new Android or iOS smartphone without compatibility issues. The Android PC Suite will even allow for a seemless backup and restore of iTunes data, so moving media files from iOS to Android or vice versa is easy.
OK, that’s the software. Let’s show you step by step how it works:
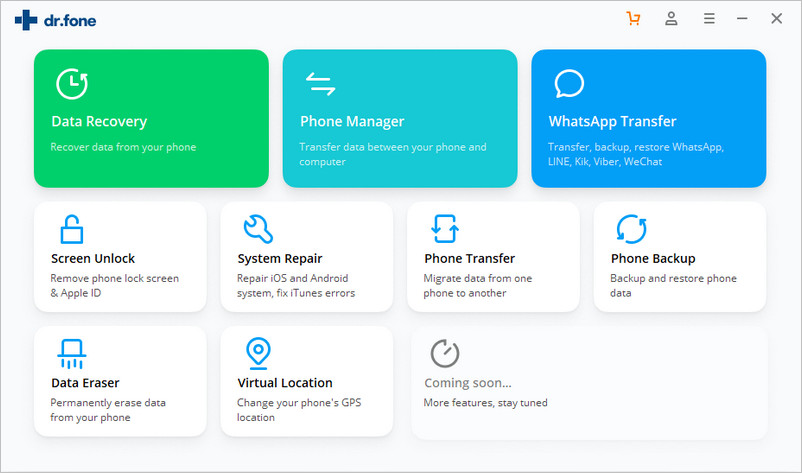
Step 1. Launch Dr.Fone – Phone Backup & Restore Software
Launch Dr.Fone on your computer, and select “Phone Backup”.
Then connect your Android phone to the computer using a USB cable. Please make sure you have enabled USB debugging mode on the phone. If your Android os version is 4.2.2 or above, there will be a pop up window on the Android phone asking you to allow USB Debugging. Please tap on OK.

Click Backup to start th backup Android phone data. If you have used this program to back up your device in the past, you can view your past backup by clicking on “View backup history”.
Step 2. Select file types to backup
After the Android phone is connected, select the file types you want to backup. By default, Dr.Fone has checked all the file types for you. Then click on Backup to start the backup process.
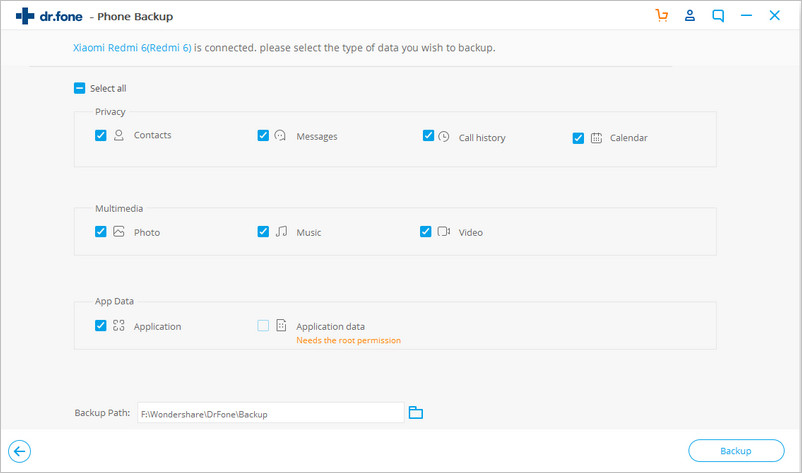
The backup process will take a few minutes. Please don’t disconnect your Android phone, don’t use the device or delete any data on the phone during the backup process.

After the backup is completed, you can click on View the backup button to see what’s in the backup file.

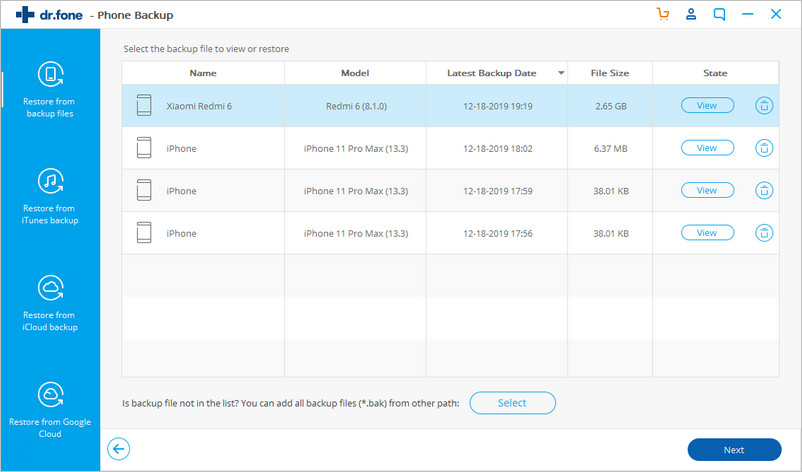
Step 3. Restore backup to your Android phone
Connect your Android phone to the computer using a USB cable. After you click on the Restore button, the program will display all the Android backup files on your computer. Select the backup file you need and click the “View” button next to it.
Step 4. Preview and restore the backup file to Android phone
Here you can preview each file in the backup. Check the files you need and click on Restore to them to your Android phone.

The whole process only takes a few minutes. Please don’t disconnect your Android phone or open any Android phone management software.

That’s it! How easy was that? All of your Android smartphone contents quickly and easily backed up to your PC for safe keeping.