Have you recently accidentally deleted photos, videos or files from your Android smartphone and are wondering how on earth they can be recovered?
Presently you have two options for recovering deleted content from Android smartphone – restoring them from your Google Account or using desktop software which specialises in locating and recovering deleted content.
Here we’ll show you how to do both. The Google restore option is free but relies on you already using Google Back up and Sync.
Restore photos & videos from your Google Account
If you deleted an item and want it back, check your trash to see if it’s there.
Note – If you have turned on Google Back up and Sync, photos and videos you delete will stay in your trash for 60 days before they are deleted forever.
Provided you are inside this window period, here’s how to recover deleted photos and files from your Google account:
1. On your Android phone or tablet, open the Google Photos app Photos.
2. At the bottom, tap Library and then Trash.
3. Touch and hold the photo or video you want to restore.
4. At the bottom, tap Restore. The photo or video will be back:
– In your phone’s gallery app
– In your Google Photos library
– In any albums it was in
If the item is not in your trash, it may be permanently deleted. At which point, you may need to consider desktop software.
Restore photos & videos using Dr.Fone – Data Recovery
If you have tried and failed to restore the files from your Google account, your next bet would be to use a popular desktop solution called Dr.Fone – Data Recovery.
You’ll need four things in order begin recovery your Android files:
1. Your current phone
2. A laptop or PC
3. A USB to smartphone cable
4. You’ll need to download a handy piece of software called Dr.Fone – Data Recovery.
Before we show a step by step of how to recover smartphone contents, here’s a brief overview of the solution Dr.Fone – Data Recovery.
Features of Dr.Fone – Data Recovery
Supports Recovery of All File Types
This Android PC suite makes the recovery of your deleted or lost data fast and painless and supports a wide number of file types including: contacts, text messages, photos, music files, videos, PDF documents and even WhatsApp messages. Use the software’s in-built scanning technology to find lost or deleted files and export them directly to your PC in just a click. Once your files are recovered, you can restore the content to your new smartphone using software such as dr. fone – Android Manager.
Recover Data from All Android Scenarios and Conditions
This Android data recovery application can recover data and content from over 6,000 supported Android smartphones and tablets and works regardless of how the data was lost. For example, the software has scanning and recovery technologies capable of recovering data from the below Android scenarios:
Accidental Deletion
System Crash
Forgotten Password
SD Card Issue
Rooting Error
ROM Flashing
Damaged
Not Responding
Black Screen
Factory Reset
OK, that’s the software. Let’s show you step by step how it works:
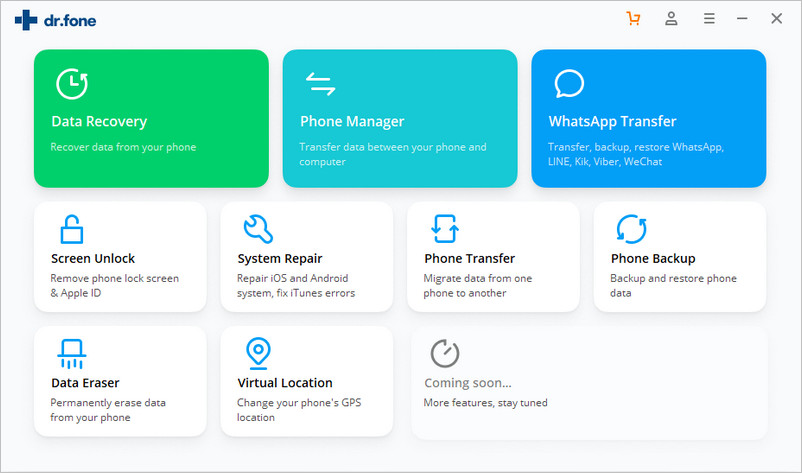
Step 1. Launch Data Recovery Software
Launch Dr.Fone on your computer, and select “Data Recovery”.
Step 2. Connect Your Android Smartphone
Connect your Android phone to the computer using a USB cable. Make sure you have enabled USB debugging on your Android phone. When your device is detected, you will see the screen as follows.
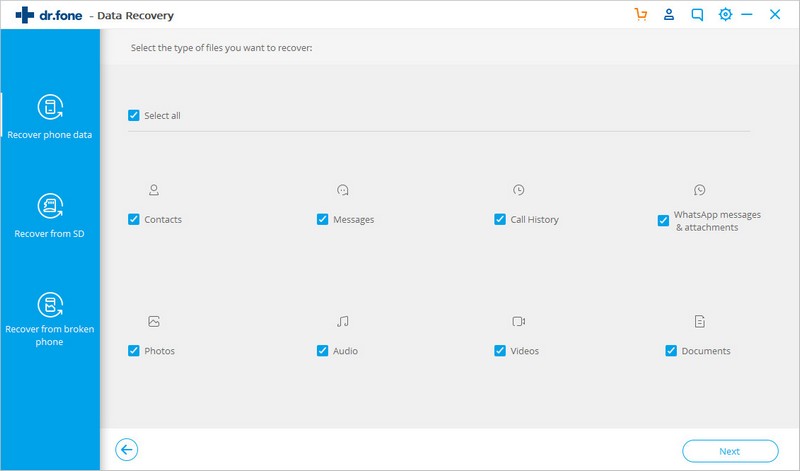
Step 3. Select the File Types to Scan
After the phone is connected successfully, Dr.Fone for Android will display all the data types it supports to recover. By default, it has checked all the file types. You can just select the type of data that you’d like to recover. If your phone is not rooted, Dr.Fone will offer two options: Scan for deleted files and Scan for all files. Scan for all files will take longer time, but will scan for files more thoroughly. Click “Next” to continue the data recovery process and the program will begin analyzing your device.

After that, it will continue scanning your Android phone to recover deleted data. This process will take a few minutes.

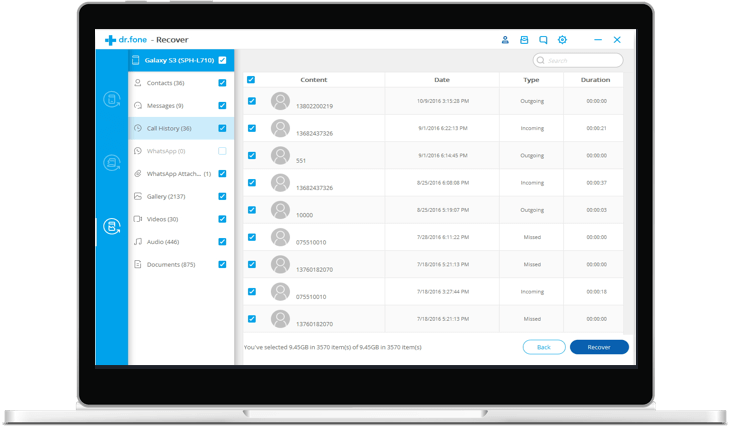
Step 4. Preview and recover deleted data
When the scan is complete, you can preview the found data. Check the items you want and click “Recover” to save them all to your computer.

Boom! Have we just made your day or what? All of your Android photos and files are back in the land of the living, ready for you to transfer from your PC to your new device. Let us know how you got on in the comments!